A Location Sound Blog

So as of this moment I am knee deep in the pre-production of a short film I’m doing the sound on called Apple. I figured that if I am to the best that I possibly can, then I better get into some research. Here are six elements of Location Sound that you simply can’t avoid.
Choosing the Right Mic
One of two major words out of ‘location sound’ is sound, and you can’t record sound without the right microphones. It is imperative that to record high-quality location sound for film you need three of the following microphones: the ultra-directional hypercardioid, directional supercardioid and less directional cardioid microphones. for cramped interior locations. The ultra-directional hypercardioid microphone is the largest shotgun mic of the bunch and can record super directional audio from a reasonable distance. This is mic best suited for out-doors recording. Next, the ultra-directional hypercardioid, this shotgun mic is what I’ll be using for Apple’s Location sound. This mic is best suited for an indoors location as it can record super directional audio, but at less of a distance than the supercardioid microphones. Last is the regular cardioid microphone and is used for standard vocals in music and for cramped spaces in location sound.
These mics (hyper and supercardioid), are perfectly suited for location sound recording as they cheery pick the sounds that are present in the microphones range and record only that (from the front end of the microphone). The rest of the microphone will reject almost all other sound making it perfect for recording dialogue and effects on set.
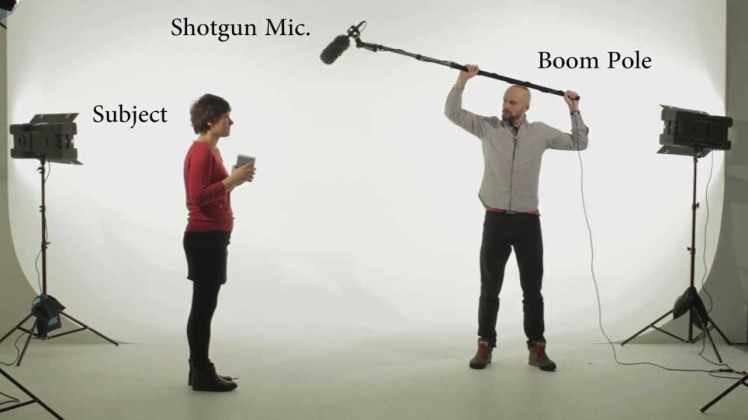
The Mic and the Actors Mouth
With the preferred microphone set up and ready to go, all you need to do is use it. The idea is that you’ll want to record a nice, warm and direct vocal/dialogue performance, which is best done with the mic being is closest proximity to the mouth. The closer the mic is placed, the more of the dialogue that will be received, and the less of the background room noise that will be picked up, making for a better performance. To do this, the microphone needs to be off screen, but as close to the actor as possible. The best way is to this is to put the mic overhead facing the actors mouth. The second-best way to do this is to place the mic below the camera frame and actor, with the mic pointing in an upward direction to face the actors mouth.
Shoot Several Takes of Every Setup
This might seem obvious but shooting multiple takes of each scene is a necessity. Even if a perfect take is shot and everyone gets the scene right, another couple of takes should still be shot for safety. I use this technique for recording bands and such for even if they get a good guitar take, another two for safety is always better. This insures that there is plenty of audio to work with for even if there is a mess up with one line of dialogue from one take, you can replace it with the same line from a different take. It is recommended that you should listen to the sound during and after each take when on location. This is just a safety net for if there is some odd noises and sounds or perhaps the mic is in the wrong position.
Record 30 seconds of Ambience
This step is on a must-need-to-happen basis. You’ll find when recording literally everything that there will be some low and annoying hum. It happens EVERYWHERE. Now sure you could just de-noise it, but without a proper timeframe of silence for the software to work, you may as well not try. To alleviate this, you could always record 30 seconds of pure silence in whatever location your filming in. This timeframe will give the software more than enough time to find the frequencies that are emitting the annoying room sound. Additionally, this 30 second ambient sound could also be used later down the line as Foley, to be inserted in the post-production stage.
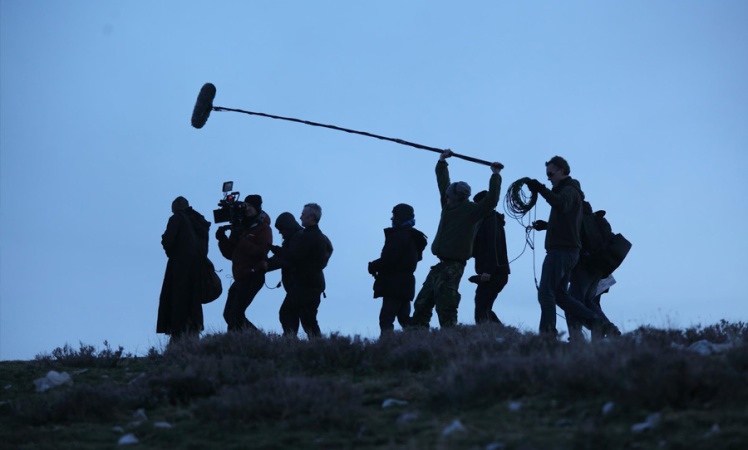
Insure the Boom Operator is Competent
When recording with a microphone, you been needing to lest fun job to be filled, the boom operator. This job is about holding a stick with a microphone on the end, perfectly. This can be difficult, but it can be done. For this there are a few small common-sense things to think about. When in the middle of a take, the boom cannot move (usually), but more importantly the boom operator’s hands cannot move. This is because the boom pole isn’t exactly quiet and moving your hands will undoubtedly make the pole rattle, which will be picked up by the mic. Using the shock mount is imperative as it removes the ‘joltiness’ and ruckus of holding and moving around with a boom and mic. The blimp is the last thing that is used on a boom mic. This can be taken off in sterile locations, but in the case of situations potentially dangerous to the mic or anywhere involving wind, this should be firmly on to insure both safety and sound quality.
Also, one small thing, Distortion. This should have been very obvious but any distorted location sound is simply unusable. As the recorder peaks, the sound will digitally clip, giving you the glory of digital distortion. It is imperative that you set your gain level before you start shooting every new scene as you want to be ready for any screaming but also be able to record the whispers as well. Watching your levels is also a complete necessity as this is your indicator of how much dB you are picking up in the recorder, and is also going to tell you how close you are to peaking and if you are already.
Wyatt Nicholls
Novice Audio Engineer
Student at SAE
References:
LA Video Film Maker. (2011). Sound recording tips: how to record location sound in film and video production. Accessed at http://www.lavideofilmmaker.com/location-sound-recording/location-sound-recording-shotgun-microphone-placement.html
[Image] https://aub.ac.uk/courses/postgraduate/film-production/
[Image] https://www.youtube.com/watch?v=xvDEAQT8aBU
[Image] https://enmoreaudio.com/sound-for-the-pictures-an-introduction-to-recording-sound-for-films/
